They are either:
- A great way to grow your business, or
- Total crap
Personally, I think ads are extremely useful — when they’re set up correctly!
You’ll get bad results if you target the wrong audience. And when you target the right users, more people will Like your page.
It’s as simple as that.
This article walks you through ways to set up a Promoted Page ad, since many of you have just started using Facebook ads for your business.
If you’ve used Promoted Page ads before, perhaps you didn’t realize there is more than 1 way to create one.
How to Use Promoted Page Ads to Get Tons of New Likes on Facebook
I will explore these 2 ways to create a Promoted Page ad:
- From your page Timeline
- Using Facebook Ads Manager
There are actually 3 ways — when you count Facebook’s Power Editor.
But I don’t see a reason to bother with Power Editor, unless you’re running lots of ads.
How to Create a Promoted Page Ad from Your Timeline
1. Click Promote Page

You’ll find this in your admin panel above the cover image on your page.
2. Notice the Sample Ad

A lightbox like the one above will provide options for your ad, which we’ll discuss later.
For now, notice the “Sample ad” at the top of this image. The sample ad shows what your advertisement will look like to other Facebook users.
3. Target a Strategic Location
For my ad, I targeted Gatesville, Texas, which appears in the ad Location field. Here’s how I did it:

Never, EVER run a Promoted Page ad without targeting specific users.
It’s a waste of money.
Facebook lets you target the users who are most likely to engage with your page. And if you’re a local company, that means people in & around the town where you do business.
If your page is international, target countries where you have the most customers.
If your product appeals to Americans, run ads that target the United States to ensure you get the right kind of fans.
4. Target Specific Interests

I’m running my ad for my bounce house business, so I targeted people who live in my town & those who Liked the Facebook page for the local school district.
Those who have school kids or are at least interested in what the school posts on Facebook will hopefully see my ad.
You should target interests related to your business, so your ad gets seen by those who are most interested in your fan page. You may pay more per Like, but for higher quality fans — it’s worth it!
5. Select Age & Gender

Next, decide if you will target a specific age group or gender. By default your ad targets men & women of all ages.
My business appeals mostly to mothers. So I set my ad to target women between the ages of 21 & 60. Though it’s more costly to target this smaller group, I’d rather pay more for targeted Likes.
6. Determine Ad Budget
Now that you’ve identified your target audience, you must decide how much you want to spend.

Costs shown above are typical, but prices may change depending on your page & target audience.
Facebook estimates the number of Likes you should receive each day based on your advertising budget. But it’s just that — an estimate!
There are no guarantees. You may spend $10 per day exposing your page to lots of people & nobody clicks Like.
I find that a $5-per-day advertising budget is affordable & effective.
7. Schedule Ad

Unfortunately, Facebook by default schedules your ad to run continuously. I learned this the hard way when I forgot to set an end date for my ad & it ran almost 3 weeks!
I got lots of good Likes, but it cost way more than I expected. Choose an end date for your ad that’s in line with how much you want to spend.
Facebook wants you to spend as much as possible. But if you choose an option like the lower choice in the above screenshot, your ad will stop on a specific day.
I usually run my ads for about a week.
8. Assign a Facebook Ad Account
If you have more than 1 Facebook ad account, you can choose which account to use for each ad. Most of you probably only have one.
You’ll also see your default payment method, which you CAN’T change when creating a Promoted Page ad from your Timeline.
You can change your default payment method by going to your Ads Manager or clicking the gear icon at the bottom left of the lightbox.
Here’s what you’ll see:

Click “Change Payment Method” to open a new tab where Facebook asks for your password.
You’re then shown the payment methods Facebook has for you on file — and may add or remove accounts.
If you click “Advanced Options” from this menu, you’ll be taken to the Facebook Ads Manager, which we will discuss shortly.
9. Promote Page

Now that everything’s arranged, it’s time to click “Promote Page” to submit your ad.
The confirmation screen should look like this:

Once your ad’s approved, it’ll start & end according to your directions.
How to Create a Promoted Page Ad from Ads Manager
Your Timeline isn’t the only place to create Promoted Page ads. You can also use your Ads Manager.
Here are the easy steps:
1. Access Facebook Ads Manager
There are several ways to access the Ads Manager, but you’ll typically see this button on your page:

Or this one:

You can also click the gear icon on the blue Facebook navigation bar:

2. Continue

Clicking “Advertise this Page” while on your Facebook page will automatically select your page to begin the process. Here, just click “Continue” to move ahead.
But if you clicked “Create Ad” from the drop-down menu or arrived at the Ads Manager some other way, you might see this:

If so, click “Page Likes” to choose which page you want to promote. Then click “Continue”.
3. Add Images to Your Facebook Ad

You can use the Ads Manager to upload as many as 6 images to appear with your ads.
Click “Upload Image” as seen on the 2nd box above or “Upload Images” to begin loading.
You may also browse the Image Library if you’d like to use files you’ve loaded before:

The library lets you choose from existing images or upload new ones.
But pay close attention to the dimensions — Facebook recommends using images that are 600 x 225 pixels.

If not sized properly, only a portion of your image may appear in the ad.
4. Change Ad Headline & Text
Here’s your opportunity to fix the headline & what the ad says:

Facebook provides a preview of what your ad will look like in the news feed & sidebar (right column).
Click “Remove” to delete ads you don’t like.
5. Decide Whether to Check “Sponsored Stories”
The above image shows that I checked “Sponsored Stories”.
Facebook leaves this box unchecked.
Though your budget might go faster if you check this box, your ad will be seen by more people who have friends who have Liked your page. It’s strong social proof, so I checked the box!
6. Adjust Advanced Options
Advanced Options let you change the:
- Landing View
- Ad Placements

Landing View is a fantastic option that you don’t have when placing a Promoted Page ad from your Timeline.

If you have apps on your page, with Landing View you can have an ad direct visitors to an app instead of your Timeline.
The app may:
- Host a contest/giveaway
- Tout product features
- Collect emails for newsletter
- Promote company blog
Landing View looks like this on Post Planner’s page:

I can direct anyone who clicks the ad to any of our custom apps!
Remember, the goal of this type of ad is to get someone to Like your page — collecting their email is a bonus.
7. Create Target Audience
There are many options for targeting ads to get the most bang for your buck.

Facebook lets you target based on:
- Location
- Age
- Gender
- Languages
- Interests
- Connections
- More Categories
Location
Along with selecting a place to show the ad, Ads Manager lets you define the size of the area you would like to target:
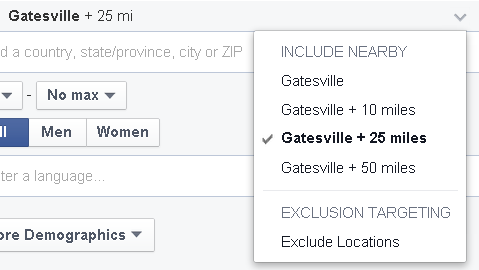
This is critical if you run a brick-and-mortar store & your ideal customers are fewer than 25 miles away.
There is no reason to target people 100 miles away because they’re not likely to come into your business.
And check out the “Exclude Locations” feature. Use this option if there is a town in the area you select that is not part of your target market.
Enter the city you wish to exclude & click the “Exclude” button:

Age & Gender
You can also target potential customers based on their age & gender, as I did when I targeted women between the ages of 20 & 60 years old.
Languages
Pretty self-explanatory: choose the language spoken by most of your target market.
Interests
Here Facebook helps you reach specific audiences by targeting pages users have liked, their interests & activities.
You can “browse” to see a range of categories — and how many people have designated each item as an interest:

Facebook also provides suggestions when you type a word or phrase:

For your ads, choose interests that relate to your company or fans.
Connections
Unless you say differently, Facebook will only show your ad to people who aren’t connected with your page.
And this is a setting you may want to change.
If you choose “All”, everyone matching your specified location, age, gender & interests may see the ad.
Or you could choose “Advanced connection targeting”:

Use this feature to target people who are connected to an existing page or event.
You can ask fans on a related page to Like a new page you’re managing.
On the flip-side, if you want to exclude people connected to a page, app or event — that option also exists. Try excluding the page you’re advertising so those who already Like the page won’t see your ad.
Finally, you can target people whose friends are connected to a page you manage. I targeted those who are friends with people who already Like my company fan page.
More Categories
Similar to targeting somebody’s interests, you can also target other categories with your ad.
Facebook says:
Use category targeting to reach groups of people who share similar interests and traits.
If you manage a page for an app that only runs on Android devices, you could choose Android users as a category.
You could target people with upcoming birthdays, newlyweds, or those who move into a new home.
This all depends on what people post on Facebook. I target the “Parent” category with my ads, and I specify parents with children in certain age groups.

 8. Name Campaign & Choose Budget
Facebook lets you name your campaigns, which makes them easier to find in Ads Manager when you return later.

I gave my campaign a name that’s easy to find & remember.
Next, I set the budget for my ad.
I can arrange a daily or lifetime budget:

9. Bidding & Pricing
Now determine how your ad dollars are spent:

The goal for your ad guides this selection.
Here’s how Facebook breaks it down:
You can choose to bid for your objective: Page likes, clicks or impressions. Your choice determines how you pay and who sees your ad.For example, when you optimize your bid for the Page Likes objective, you’ll pay for your ad to be shown to people within your target audience who are more inclined to like your Page.
Facebook helps you define the right “objective” for your advertising.
According to Facebook, if you’re running an ad to get page Likes, select “Bid for Page Likes”.
10. Place Order
When finished, click “Place Order” and you’ll see this message:

Seven ads were created from this one campaign:


If you upload an image that doesn’t meet the size requirements discussed earlier, only a portion of the image will show up on the ad. And you could end up with a photo that is poorly placed.
To reposition the image click “Reposition Image” and drag the photo up & down until you find the desired result:

Click “Done” then scroll to the bottom of the ad & click “Save”.
This will open the following window:

Facebook must approve all ads & changes before they go live.
How the 2 Ads Differ
Creating a Promoted Page ad from your Timeline is simple, and that’s how you’ll likely build most of your ads.
But using the Ads Manager is the best way to go.
The Ads Manager has unique features like:
- Ability to choose 6 images for your ad
- Target in & around a desired city
- Target broad range of Interests & Categories
- Clearly define audience to help gauge potential reach
- Ability to adjust Landing View
- Target fan connections & fans of other pages you manage
- Exclude cities within a target area
- Choose where to place ad in regard to news feed & sidebar
- Ability to change ad headlines & copy
If you want more control over how an ad looks & who it targets, use Ads Manager to create the ad.
Use your Timeline to quickly create ads that will receive almost immediate approval from Facebook.
RESULTS from My Ads
Check out the results from the ads I set up for this blog post:
Promoted Page Ad Created from Timeline
The ad I created from my timeline did not perform well.
I hadn’t gotten much exposure at first because I chose to target women between the ages of 21 & 60 who had also liked the school district Facebook page.
I deleted that ad & started over. And I didn’t include the school district as a targeting factor the 2nd time around.
Here are results from the 2nd ad:

For $15, I gained 15 new Likes & the ads reached about 1,300 people.
Notice how on February 17th & 18th the ad had ZERO Likes? That’s because I targeted too specific of a group.
Around this time, I eliminated the school district as a targeting factor & the ad started performing better.
Ad Created with Ads Manager

I was surprised when the Promoted Page ad I created in Ads Manager didn’t do as well as the ad I placed straight from my Timeline.
For this campaign, I paid about $1.48 per Like. And I only paid $1 per Like for the ad I placed from the Timeline.
Here are results from the Ads Manager ads:

The Sponsored Stories ad generated the most Likes.
And Ad-Image 1 had the lowest cost per Like.
Conclusion: Which Campaign Performed Best?
Of the two ads, the Timeline ad saw the best results.
The cost per Like was lower & the ad generated more Likes than the Ads Manager ad over the same time period.
However, I continued running the Timeline ad for 3 more days & the cost per Like jumped to $1.35 without me changing any targeting:

But despite the lower results, I suggested creating your Promoted Page ads within the Ads Manager where you definitely have the most control.
Không có nhận xét nào:
Đăng nhận xét